709-218-7927 The Landfall Garden House 60 Canon Bayley Road CANADA A0C 1B0 |
|
|---|
.JPG)
Vermicomposting in the cold-climate apartment- Building a Tower Vermicomposter
This note describes the materials and process for constructing a domestic (dwelling kitchen) continuous-flow vermicomposter tower from empty pails
Time
The process described here takes me thirty minutes including setup and cleanup. A tower of three stacked pails is the result.
Materials
Obtain three to four 25-litre (5-gallon) pails. There is no need to clean them, but they should be empty, and drained pretty well dry. These pails when stacked will form the tower
Obtain an old vegetable drawer from a refrigerator. The lowest pail will stand, inverted, in this drawer. There must be easy access for a scoop or garden trowel. Therefore the drawer should be at least as wide as the mouth of the pail, and about one-and-a-half times as long. A twelve-inch diameter pail will require a drawer thirteen by 20 inches or thereabouts.
Tools
In constructing my latest tower I made use of:
- Low-energy power saw to facilitate fast and even cutting of the plastic pails.
- Tape measure
- Strong kitchen knife for trimming remnants of plastic
- Vacumn cleaner!
SetUp
I measured the space which was to receive the tower. This space is usually next to the refrigerator, or alongside the washing-machine/dryer in the small laundry closet. Make sure your intended space can receive the tower before you go to work cutting and trimming!
I placed a pair of old socks over my bedroom slippers. It is far easier to remove plastic chards and powder from socks than from the inside of fleecy-lined slippers.
I vacuumed my work-area before starting work. Reasons are set out at the end of this document (see “Christmas Card”).
Cutting
I checked the measurement of my pails. Since the plan is to build an cone-shaped device (where the bases is wider than the top), my pails will be stacked up-side down, so that the wider lip is lower than the narrower base. I will be cutting a disc from each lid, and the lid of one pail will straddle the rim at the base of the lower pail.
The base has a rim that runs from ten to ten-and-a-quarter inches diameter, so my disc should be about nine-and-a-half inches diameter. Most pails I have seen have ledges on the lids, and it is pretty obvious where they are going to sit.
I secured the lids to two of my three pails (or three of my four pails etc) and used the saw to remove a disc of material slightly smaller than the rim of the base. The saw makes a channel or a cut right through the lid. If a channel, I use the stout kitchen knife to complete the cut. The disk falls away and is removed.
At this point I can stack the three pails upside down and see how the device will appear. This is a good time to check once more the target storage space.
With the saw, I remove the base of all the pails, running the saw (and hence the knife) as close to the rim as I can.
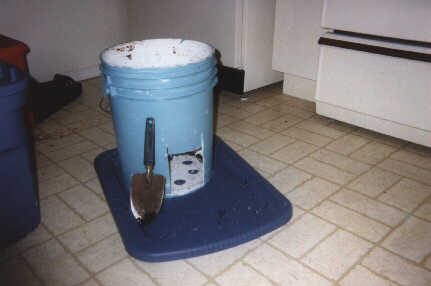
From the bottom pail I remove a four-inch square access hole, running four inches down from the wide rim. It is from this access hole that I will scoop composted material.
Stacking
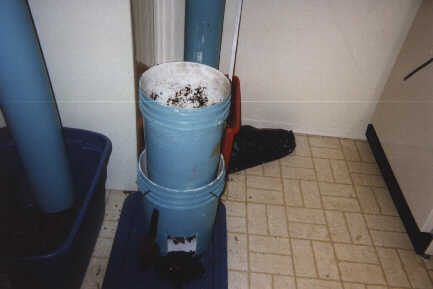
A piece of cake. The lowest bin is placed wide-end down, so that the four-inch doorway is in contact with the ground. For each remaining pail, the rim is placed securely (most pails have a lid that snaps into place) and the pail is placed on the lower pail, in each case lid-downwards.
Place the drawer in the chosen location. Place the tower in the drawer, with the doorway facing towards you for easy access.
Cleanup
Vacumn the floor, remove the socks and rinse.
If your pleasure lies in fabricating Christmas cards, you may care to sweep the plastic chards into an envelope. White pails with green lids produce a fascinating blend of white and green chards, Christmas snow, if you like. Paint a tree design on cardboard with glue, then press in chards to dry. Shake off any excess. A beautiful Christmas-tree card made from a useable resource. Not garbage. Not waste.
Loading
709 218 7927 CPRGreaves@gmail.com
Bonavista, Wednesday, June 03, 2020 12:27 PM
Copyright © 1996-2020 Chris Greaves. All Rights Reserved.